
Computer with Zebra Browser Print
By- Hari Shyam
The below setup is adaptable to the discontinued Zebra LP2824 Plus. We've added notes where steps differ significantly.
The supported connection to your Zebra ZD410 from a MAC or Windows computer is via a USB certified (version 2.0) cable. The tested and supported browsers are Google Chrome and Mozilla Firefox.
Setting up your Zebra ZD410 involves the following steps which are described in greater detail below:
- Connect your Zebra ZD410 printer
- Insert your Zebra ZD410 label roll
- Calibrate your Zebra ZD410 printer
- Print your Configuration reports
- Install the Zebra Browser Print application (Mac or Windows)
For more information on supported label sizes and information, click here.
For more information on your account's label printing capabilities, go to Printing labels.
For more information on troubleshooting your Zebra ZD410's printing issues, click here.
Additional reference material for the Zebra ZD410
- Zebra's QuickStart Guide
- Zebra's full Wireless Guide
- Zebra's full User's Guide
- Zebra's How-To Videos
1. Connect your Zebra ZD410 printer
- Follow the steps below to connect the printer into an AC electrical outlet. The light on the power cycle rectangle turns green once power is connected.

- Connect your USB certified (version 2.0) cable from your printer to your computer's USB port.
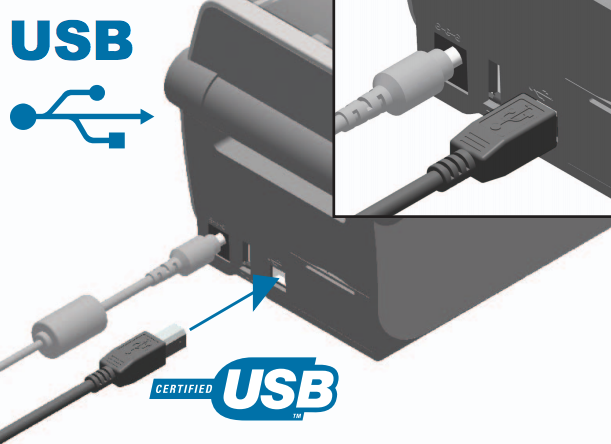
NOTE: It's best to use direct connections instead of USB hubs and power cords.
2. Insert your Zebra ZD410 label roll
- To open the printer's lid, pull the yellow latches towards you and lift the lid upwards.
- Pull the yellow roll guides apart and insert the roll with the labels face up.
- Release the the roll guides and push them together to make sure the roll is secure and turning freely.
- Pull the labels out past the cutter at the front of the printer.
- Push the labels under the roll guides.
- Flip the labels up and align the media sensor to the center position.

- Push the lid down to snap both yellow latches shut.
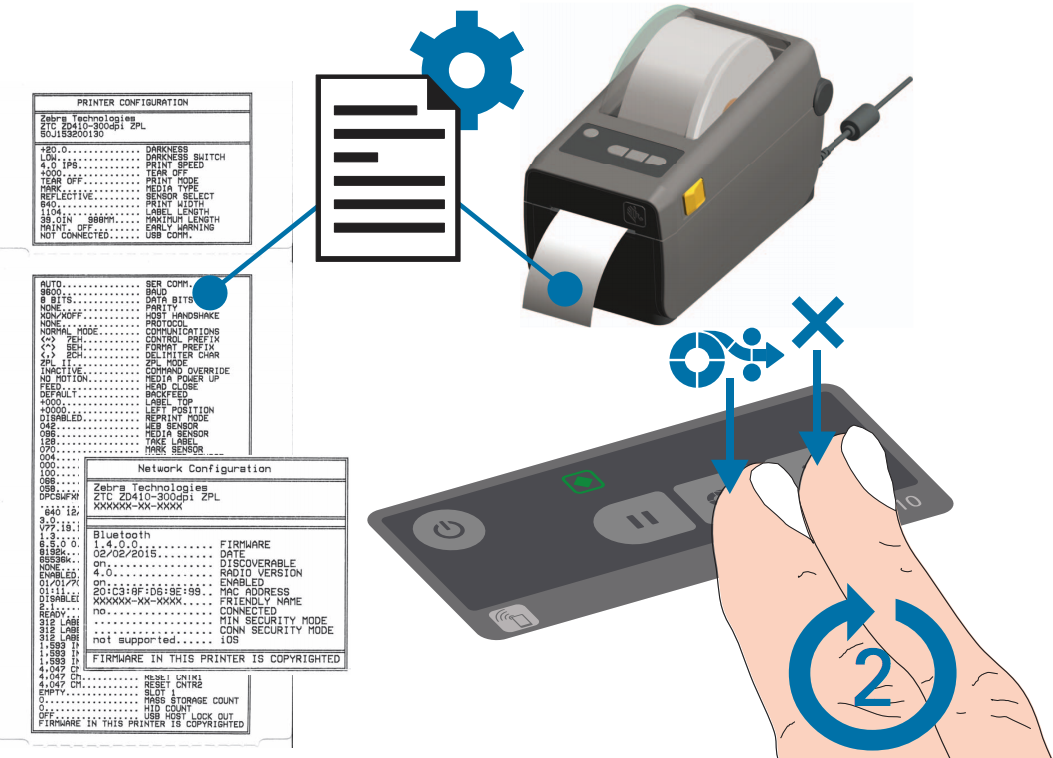
3. Calibrate your Zebra ZD410 printer
For the printer to recognize the size of your labels, perform an initial calibration:
- Follow the steps in sections 1 to 2 above.
- Press the power button and wait for the solid green status indicator light.
- Hold the pause and cancel buttons down for 2 seconds and let go. The printer will measure and feed a few blank labels.
- Once the printer stops and the status indicator light is solid green, the calibration is complete.

NOTE: An initial calibration is necessary when the new roll is a different label size. You do not need to calibrate after inserting a new roll of the same label size. The printer will automatically adjust or you can press the feed button twice before printing. If you are using the discontinued Zebra LP2824 Plus, hold down the green feed button and release after the status light ring flashes once and then twice.
4. Print your Configuration reports
To verify your printer is operating, print your Configuration reports:
- Follow the steps in sections 1 to 3 above.
- Hold the feed and cancel buttons down for 2 seconds and let go. Your Configuration reports will print.
 NOTE: If you are using the discontinued Zebra LP2824 Plus, hold down the green feed button and release after the status light ring flashes once.
5. Install the Zebra Browser Print application (MAC or Windows)
MAC
- Follow the steps in sections 1 to 4 above.
- From the main menu of your Lightspeed Retail account, click Settings > Shop Setup and select your Shop Namefrom the list.
- From the Product Labels section, select the Enable Zebra Browser Print checkbox.
- From the left menu, click the blue Save Changes button.
- From the main menu, click Inventory > Print Labels.
- Click the Print All button or the Label icon to the left of an Item Description.NOTE: If you don't see items in your list, go to Printing labels to build a label queue. The article also includes more information on other sections in your account where you can print labels to your Zebra ZD410 printer.
- From the new window, click Install Zebra Browser Print.

- From the bottom left of your browser window, click the BrowserPrint-1.2.0.dmg file.

- Click and hold to drag and drop the Zebra Browser Print application into your Applications folder.

- Double click the Zebra Browser Print application to open it.
- Read the Browser Print End User License Agreement and click I Agree.

- From the Browser Print Security Certificate window, click OK. This will launch a new tab in your computer's default browser.
 NOTE: If your computer's default browser is not correct, copy and paste the URL into a tab in the browser you use with your Lightspeed Retail account (Chrome or Firefox).
 - From the new browser window, click Advanced > Proceed to localhost (unsafe).

- From the new Select an Option window, click Yes.

- Once you see the below message, the Zebra Browser Print application is successfully installed. You can close the browser tab and return to your Lightspeed Retail account. For more information on your Lightspeed Retail account's label printing capabilities, go to Printing labels.

Windows
- Follow the steps in sections 1 to 4 above.
- From the main menu of your Lightspeed Retail account, click Settings > Shop Setup and select your Shop Namefrom the list.
- From the Product Labels section, select the Enable Zebra Browser Print checkbox.
- From the left menu, click the blue Save Changes button.
- From the main menu, click Inventory > Print Labels.
- Click the Print All button or the Label icon to the left of an Item Description.NOTE: If you don't see items in your list, go to Printing labels to build a label queue. The article also includes more information on other sections in your account where you can print labels to your Zebra ZD410 printer.
- From the new window, click Install Zebra Browser Print.
- From the bottom left of your Browser window, click the BrowserPrint-1.2.0.exe file.

- From the User Account Control window, click Yes.

- From the Setup - Zebra Browser Print window, click Next > Next > Next > Install > Finish.

- Read the Browser Print End User License Agreement and click I Agree.

- From the Browser Print Security Certificate window, click OK. This will launch your computer's default browser.
 NOTE: If your computer's default browser is not correct, copy and paste the URL into a tab in the browser you use with your Lightspeed Retail account (Chrome or Firefox).
 - From the new browser window, click Advanced > Proceed to localhost (unsafe).
- Once you see the below message, close the browser tab and return to your Lightspeed Retail account.

- Still in the PRINT LABELS section, click the Print All button or the Label icon to the left of an Item Description.
- From the new Select an Option window, click Yes.

- The Zebra Browser Print Application is now successfully installed. For more information on your Lightspeed Retail account's label printing capabilities, go to Printing labels.


No comments:
Post a Comment
Welcome