
By-: Hari Shyam 24.08.2019
You will first need to connect the scanner to your computer or laptop. For instructions on this, see pages 2- 5 in this manual Honeywell Genesis 7580g
Configure your Scanner
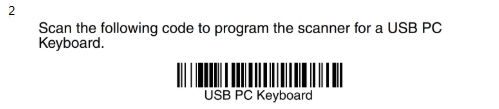
- Once the scanner has been connected your laptop or PC, go to page 7 of the manual and scan the USB PC Keyboard barcode.
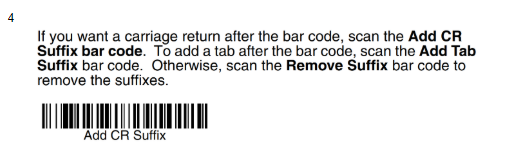
- After this scan the suffice code on page 10: Add CR Suffix.
- Test that the scanner is working by doing a Word Pad test.
- If it is not working, follow the steps below to re-configure the scanner
Re-Configuring your Scanner
There are 5 steps to re-configure your barcode scanner, each of these steps is completed from scanning a barcode, so in total you will need to scan all 5 barcodes in order of 1-5:


Please Note:
- Click here, for a printable version of the barcodes for reconfiguration
Testing that your Scanner is configured (Word Pad Test)
- Open an editor such as Microsoft Word, Notepad, etc.
- Plug your barcode scanner into your computer
- Scan a member's barcode or any barcode of an item which you have close by
- The barcode number should appear on your word editor on screen, and the cursor move to the line below
- If the cursor does not move to the line below, you will need to re-configure your scanner
If you want a copy of the re-configuration steps to print out to scan, click here.
Having trouble?


No comments:
Post a Comment
Welcome